How to Cover a Cake With Fondant (Step-by-Step Tutorial)
")
How to Cover a Cake With Fondant (Step-by-Step Tutorial)
Fondant gives cakes a smooth, elegant, and professional
finish. Whether it is for a birthday, anniversary, or a designer theme cake,
fondant instantly transforms a simple sponge into a polished, celebration-ready
dessert.
Many home bakers in Bhopal often feel nervous about using
fondant for the first time, but the process is easier than it looks when broken
into clear steps.
This step-by-step guide explains exactly how to cover a cake
with fondant, using simple techniques, beginner-friendly tools, and reliable
methods followed by many professional bakers in popular Cake Shops in Bhopal.
Readers who love baking at home or want to elevate their decorating skills will
find this tutorial helpful. As a bonus, those exploring Online Cake Deliveryin Bhopal can also understand the effort behind achieving such flawless
fondant finishes.
What You Need Before You Start
Before covering a cake with fondant, gather the essentials.
High-quality tools and ingredients help create a cleaner, smoother result.
Ingredients
- A
fully baked cake (6 or 7 inch round is perfect for beginners)
- Buttercream
or ganache for crumb-coating
- Ready-to-roll
fondant (store-bought or homemade)
- Cornflour
or icing sugar for dusting
Tools
- Rolling
pin (preferably non-stick)
- Fondant
smoother
- Sharp
knife or pizza cutter
- Offset
spatula
- Bench
scraper
- Cake
turntable
- Cake
board
Once everything is ready, the process becomes smooth and
manageable.
Step 1: Prepare the Cake Properly
Fondant should always be applied over a completely cooled
and well-prepared cake. This ensures the surface stays firm and prevents
bulges.
- Level
the cake using a sharp knife or cake leveler.
- Remove
the dome so the top is flat.
- Fill
the layers with buttercream or ganache.
- Place
the cake on a sturdy cake board.
A strong base is essential because fondant is heavier
than regular frosting.

Step 2: Apply the Crumb Coat
A crumb coat is a thin layer of buttercream or ganache that
seals crumbs and creates a smooth base.
- Using
an offset spatula, apply a thin layer of buttercream around the cake.
- Smooth
it using a bench scraper.
- Fill
any holes or uneven spots.
- Crucial
Step: Chill the cake for 20–30 minutes until the coating becomes firm.
Fondant sticks best to a firm, chilled surface. Many
professional cake shops in Bhopal rely on a ganache crumb coat because it sets
very firmly, but beginners can easily use buttercream too.

Step 3: Knead the Fondant Until Soft
Fondant straight from the packet is usually stiff. Kneading
helps soften it and make it pliable.
- Dust
the working surface lightly with cornflour or icing sugar.
- Knead
the fondant using your palms, folding it inwards.
- Continue
until it becomes smooth and stretchy.
- If
cracks appear, add a little shortening to fix the texture.
The goal is to achieve a soft, elastic, dough-like
consistency. Over-kneading may cause dryness, so aim for 3–5 minutes only.
Step 4: Roll Out the Fondant Evenly
Rolling fondant evenly is one of the most important steps.
Thick fondant becomes heavy, while extra-thin fondant tears easily.
- Shape
the fondant into a round disc.
- Dust
the rolling pin lightly to prevent sticking.
- Roll
the fondant outward from the center.
- Rotate
it slightly after each roll for an even circle.
- Roll
until the fondant is around 3–4 mm thick.
Pro Tip for Measuring Size: Cake diameter + cake
height × 2 For example, a 6-inch cake with a 4-inch height needs fondant
rolled to at least 14 inches across.
Check for air bubbles. If any appear, gently prick them with
a pin and smooth the area.

Step 5: Drape the Fondant Over the Cake
This is the moment many beginners feel nervous about, but
with a calm, steady movement, it becomes easy.
- Lift
the fondant using the rolling pin by wrapping it gently over the pin.
- Bring
it onto the cake.
- Unroll
it slowly over the top, letting it drape naturally around the sides.
Do not stretch or pull. Fondant stretches on its own
weight and settles perfectly when handled with gentle movements.

Step 6: Smooth the Top First
Start smoothing from the top before moving to the sides.
- Use
your hands or a fondant smoother to press the top gently.
- Remove
any air trapped underneath by moving from the center outward.
- Ensure
the top looks flat and wrinkle-free.
This gives a stable surface to work on before shaping the
sides.
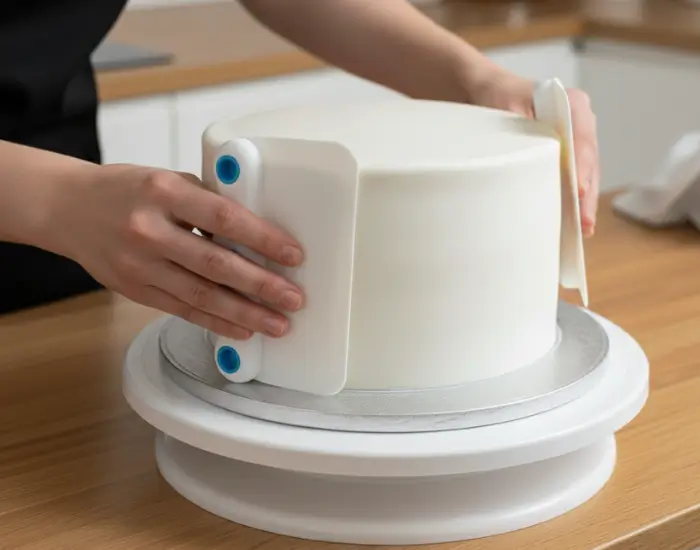
Step 7: Smooth the Sides Carefully
The sides demand more attention because fondant tends to
wrinkle near the bottom (like a skirt).
- Lift
the fondant slightly from the bottom edge with one hand.
- With
the other hand, smooth downward using open palms to attach it to the side.
- Work
around the cake inch by inch.
- Continue
until there are no folds or creases.
Use a fondant smoother to finalize the shape. Move it in
upward-downward motions for sharper lines.

Step 8: Trim the Excess Fondant
Once the fondant is firmly in place:
- Hold
a sharp knife or pizza cutter at a slight angle close to the cake board.
- Trim
the extra fondant around the base neatly.
- Press
the bottom edge gently with the smoother to seal it neatly.
Step 9: Smooth Again for a Polished Look
After trimming, the cake should be smoothed again for that
bakery finish:
- Use
two fondant smoothers to press opposite sides gently.
- Hold
both smoothers together against the side and top edge for sharper edges
(if desired).
- Rotate
the cake on the turntable for a perfect, uniform appearance.
Step 10: Add Decorations (Optional)
Once the fondant is set, it becomes an excellent surface for
decorations. You can add:
- Fondant
bows and flowers
- Textured
patterns using embossing mats
- Painted
designs with edible colors
- Piped
royal icing details
- Edible
pearls
This is where creativity shines, and the cake transforms from simple to beautiful.
Enhance Your Fondant Cake with Personal Touches!
Once your cake is perfectly covered, why not add a heartfelt message? Learn how to
Common Mistakes & How to Avoid Them
Learning these small details helps beginners achieve
consistent results.
- Fondant
tearing: Usually caused by rolling too thin. Keep thickness around 3–4
mm.
- Bulges
on the side: The cake may not be chilled enough before covering, or
the filling is too soft. Always chill the crumb coat well.
- Dry
or cracked fondant (Elephant Skin): This occurs when fondant is
over-worked or exposed to air too long. Knead well and work relatively
quickly.
- Sticky
fondant: Your hands are too warm or the environment is humid. Use
cornflour or icing sugar lightly on your hands and surface.
Why Fondant Cakes Are Popular in Bhopal
Many customers choosing Online Cake Delivery in Bhopal
prefer smooth fondant designs because:
- Fondant
looks clean, elegant, and premium.
- It
allows for highly customized theme cakes and sculpted cakes.
- The
surface stays stable during transport within the city traffic.
- Colours
and decorations stay neat for hours, perfect for parties.
Professional bakers across well-known Cake Shops in Bhopal
use these same techniques to maintain quality and design consistency.

Final Thoughts
Covering a cake with fondant is a skill that improves with
practice, but even beginners can achieve impressive results by following a
step-by-step approach. Proper preparation, correct thickness, gentle handling,
and patient smoothing make all the difference.
We hope this tutorial gives home bakers in Bhopal the confidence to try fondant cakes!
Don't have time to bake? If you want a flawless
fondant cake for your next special occasion without the hassle, check out our
latest designs at Blue Heaven. We offer premium customized cakes and
reliable online cake delivery across Bhopal.
Related Products


Share Your Thoughts